
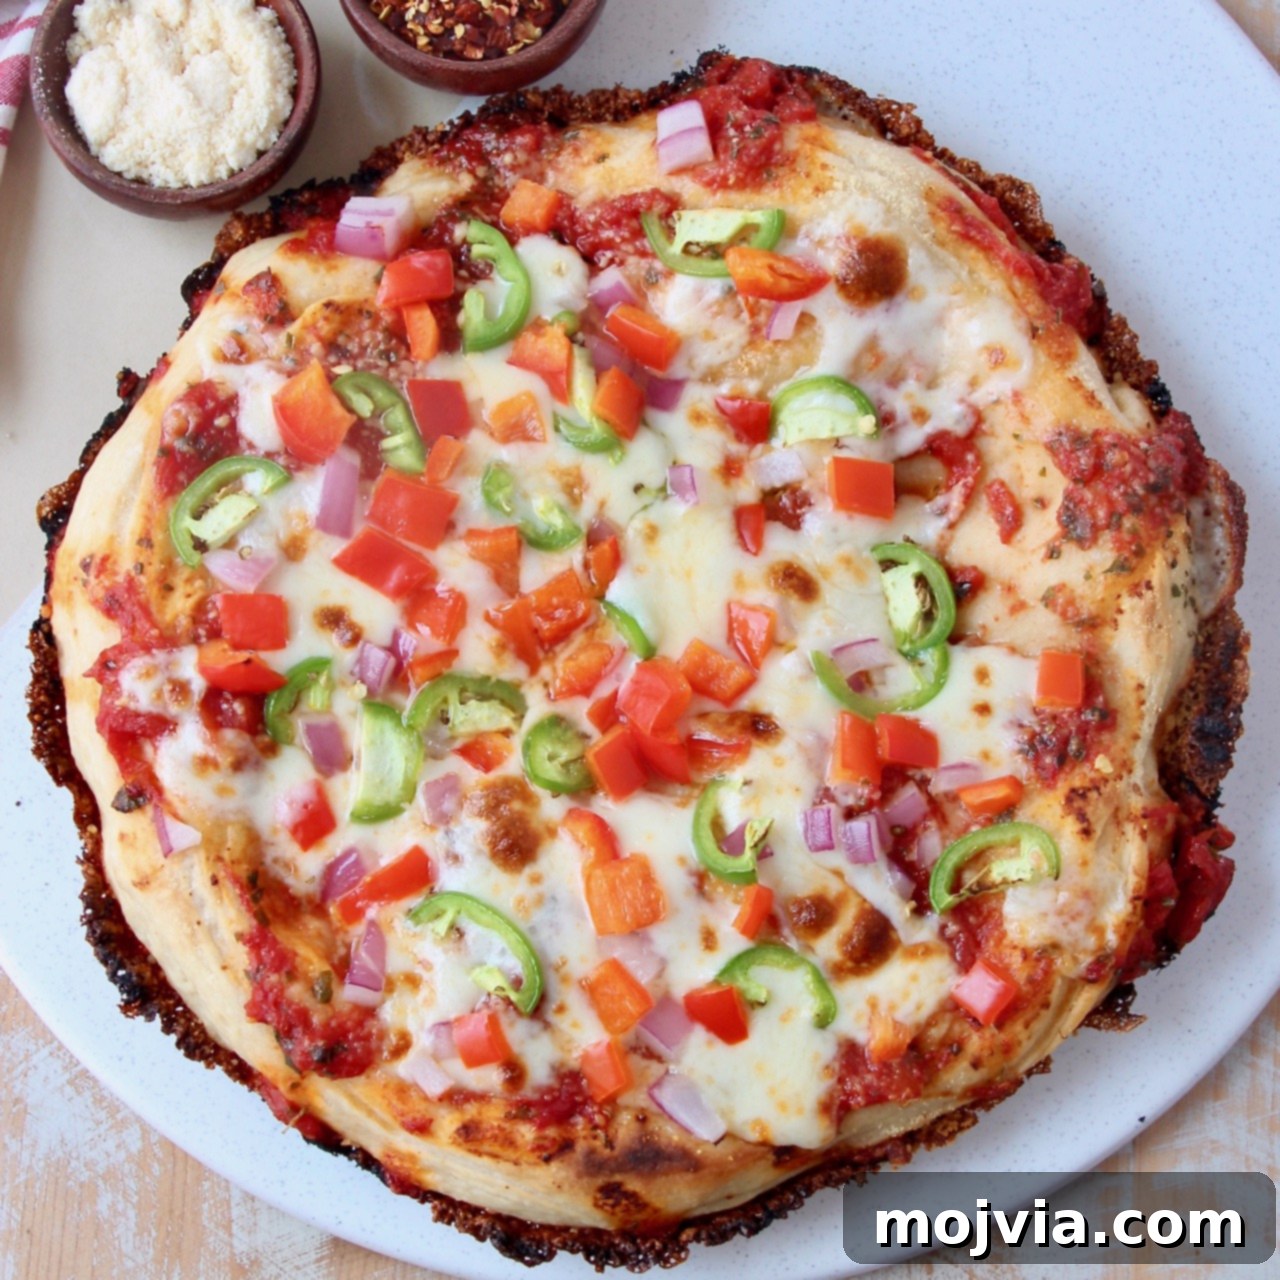
Embark on a culinary journey to create the ultimate homemade pan pizza. This recipe, developed through extensive testing, features a rich, handmade pizza dough, a uniquely seasoned crust, and an unforgettable crispy cheese ring, all brought together with a simple yet incredibly flavorful pizza sauce.
My husband, Kurt, dedicated over 18 months to perfecting every nuance of this recipe, meticulously refining techniques and ingredients. Follow his expert tips and tricks to elevate your home pizza-making to an art form and craft what we confidently call the best pan pizza you’ll ever taste!
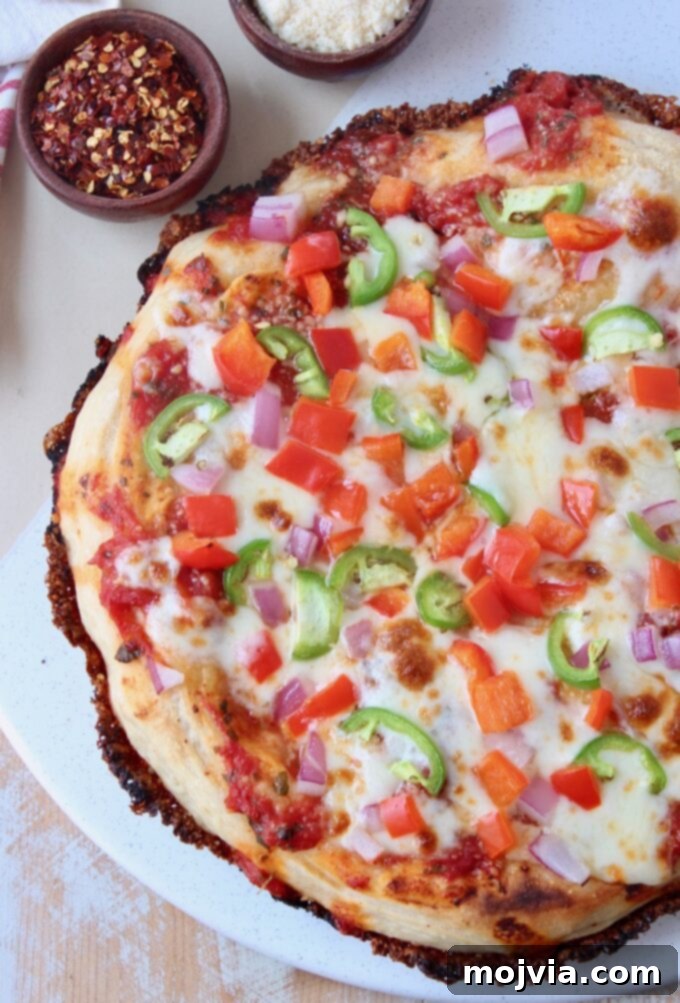
In 2020, amidst a global shift towards home cooking, my husband, Kurt, began an ambitious quest: to create the **best homemade pan pizza**. His dedication was unmatched; our television frequently displayed new YouTube videos demonstrating various pizza-making techniques, as he absorbed knowledge from master pizzaiolos and noted insights from our favorite pizzerias across the country.
Our childhood memories were filled with the delightful pan pizza from Pizza Hut, a beloved classic known for its unique crust that perfectly balances the chewiness of a thin crust with the satisfying depth of a deep dish. It was this nostalgic flavor profile that Kurt aimed to recreate and surpass. Furthermore, the iconic seasoning from Pizza Hut’s breadsticks provided a crucial inspiration. Thanks to a valuable tip from a former Pizza Hut employee on a Reddit thread, we developed our own “hut seasoning mix” – a secret weapon for an incredibly flavorful and seasoned pizza crust.
Kurt’s 18-month odyssey involved weekly Friday night pizza experiments. He meticulously tested variations of dough recipes, refined the pizza sauce, experimented with different types and quantities of cheese, and observed how various toppings influenced the final product. A truly transformative decision was to strategically add mozzarella cheese around the crust’s perimeter. This ingenious technique creates a magnificent **crispy cheese ring**, elevating this already fantastic homemade pizza into an unparalleled culinary masterpiece – truly, **the best pizza ever**!
Each Friday night for those 18 months, I shared glimpses of Kurt’s latest pizza creations on Instagram. The response was overwhelming; dozens of eager followers consistently messaged me, begging for his secret recipe. The anticipation has been building, and today, that wait is over!
It is with immense pleasure that I finally introduce you to **Kurt’s Famous Crispy Cheese Crust Pan Pizza**!
Table of Contents
- The Secret to the Perfect Pan Pizza Dough
- Crafting the Simple Yet Flavorful Pizza Sauce
- Choosing the Ideal Cheese for Your Pan Pizza
- Mastering the Art of Pan Pizza Assembly and Initial Bake
- Adding Toppings and Finishing the Bake
- Curating the Best Toppings for Your Pan Pizza
- Expert Tips and Tricks for Pan Pizza Perfection
- Frequently Asked Questions About Pan Pizza
- More Tested and Perfected Italian Recipes From Our Kitchen
- Ultimate Crispy Cheese Crust Pan Pizza Recipe Card
The Secret to the Perfect Pan Pizza Dough
The foundation of an extraordinary pan pizza lies in its dough. Our perfected recipe can be conveniently prepared using a bread machine, a stand mixer, or even a simple bowl with an electric hand mixer. While we’ve achieved fantastic results with all three methods, the bread machine often offers the most hands-off approach, simplifying the process significantly.
Using a Bread Machine for Pizza Dough:
If your bread machine features a dedicated pizza dough function, simply add all the dough ingredients directly into the machine. Select the pizza dough setting and let the machine handle the mixing and initial rise. Once the cycle is complete, carefully remove the dough, transfer it to an oiled bowl, and cover it with a clean kitchen towel. Allow it to rest for at least one hour, or for up to eight hours, in a warm spot on your kitchen counter. This extended resting period is crucial for developing the dough’s rich flavor and ideal texture.
Preparing Dough with a Stand Mixer or Electric Hand Mixer:
For those using a stand mixer or an electric hand mixer, follow these detailed steps to achieve a perfectly pliable and airy dough:
- Begin by combining bread flour, salt, granulated sugar, active dry yeast, olive oil, and 5 ounces of room-temperature water in the bowl of your stand mixer or a large mixing bowl.
- Attach a dough hook to your stand mixer or use an electric hand mixer with dough attachments. Mix the ingredients on a low speed for approximately 2 minutes until they just come together.
- Pour in the remaining 5 ounces of water. Increase the mixer speed to medium and continue to mix the dough for a full 15 minutes. This extended mixing time effectively replaces traditional hand-kneading, developing the gluten necessary for a chewy yet tender crust.
- Once mixed, cover the dough in the bowl with a clean towel and let it rest in a warm place for about 1 hour, or until the dough has visibly doubled in size. This initial proofing allows the yeast to work its magic.
- After the first rise, gently “punch down” the dough to release the air. Then, fold the dough in half, pressing gently. Repeat this folding process six times in a row. This technique further strengthens the gluten network and creates a more even crumb structure.
- Cover the dough once more and allow it to rest for a minimum of one hour, or ideally up to 8 hours, in a warm environment. This second, longer proofing deepens the flavor and enhances the dough’s texture, contributing significantly to the signature pan pizza experience.
This recipe yields enough dough for two delectable pan pizzas. If you plan to make only one pizza, divide the dough in half. The unused portion can be stored in an airtight container lightly coated with olive oil and refrigerated for up to two weeks. This makes it incredibly convenient for future pizza nights!
Crafting the Simple Yet Flavorful Pizza Sauce
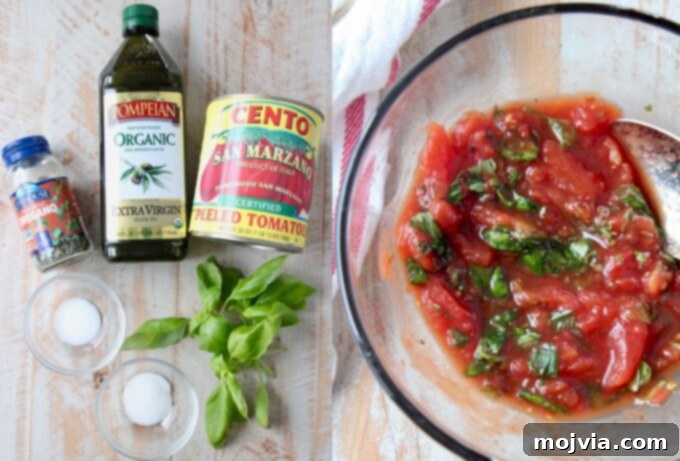
Understanding the difference between pasta sauce and pizza sauce is fundamental: pasta sauce is typically cooked on the stovetop to develop its flavors, while authentic pizza sauce is left uncooked before being spread on the dough. This raw approach allows the vibrant, fresh flavors of the tomatoes and herbs to truly shine during the pizza’s baking process. For this reason, we highly recommend using only high-quality canned tomatoes and fresh herbs whenever possible to maximize flavor.
The Importance of San Marzano Tomatoes:
For an unparalleled pizza sauce, we emphatically recommend using San Marzano tomatoes. These prized plum tomatoes hail from the Agro Sarnese-Nocerino region of Italy and are celebrated globally for their superior flavor profile. They offer a remarkable balance of sweet, juicy tomato goodness with a subtle, pleasing acidity, making them the perfect base for our simple yet sophisticated sauce. Their dense flesh and fewer seeds also contribute to a smoother, richer sauce.
Two Simple Steps to an Incredible Sauce:
Preparing this flavorful sauce is incredibly straightforward, taking mere minutes:
- Carefully remove three whole peeled San Marzano tomatoes from their can. Using your hands, gently crush them into a medium-sized bowl. This preserves their natural texture and releases their concentrated flavor more effectively than blending.
- Add the fresh basil, fresh oregano, salt, granulated sugar, and a drizzle of olive oil to the crushed tomatoes. Mix all the ingredients together thoroughly until well combined.
That’s it! This super easy sauce can be whipped up in moments, often while Kurt is busy preparing the pan for the pizza dough, ensuring everything is fresh and ready for assembly.
Choosing the Ideal Cheese for Your Pan Pizza
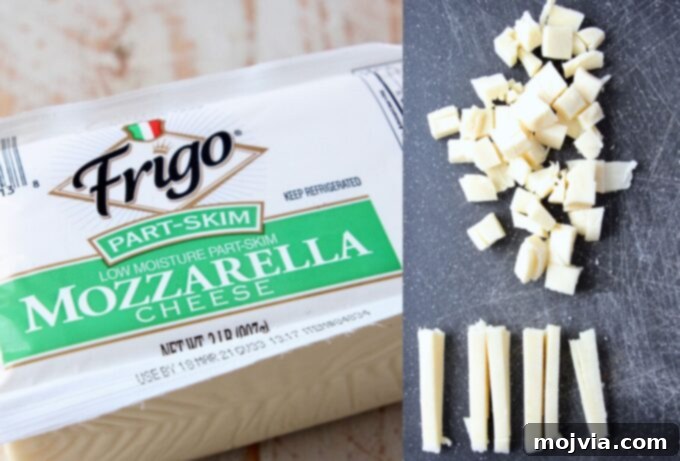
During the exhaustive “pizza experiment of 2020,” Kurt meticulously tested various cheeses to find the perfect match for our pan pizza. His findings unequivocally pointed to **low-moisture mozzarella cheese** as the superior choice. This type of mozzarella melts beautifully, creating a delicious, even layer of gooey cheese across the pizza without making it greasy or weighing down the crust. Whether you opt for whole milk or part-skim, the key characteristic to look for is “low moisture.”
The way you prepare the cheese is also crucial. Kurt recommends cutting the mozzarella into small, uniform cubes for the main topping of the pizza. For the signature crispy cheese crust – the “cheese ring” – he meticulously cuts the cheese into slim strips. These strips are then strategically placed around the edge of the pizza dough, ensuring they meld perfectly with the crust to create that irresistible golden crispiness.
Mastering the Art of Pan Pizza Assembly and Initial Bake
While having a great pizza dough and sauce is essential, Kurt’s unique pan pizza preparation tips and tricks are truly where the magic happens. These techniques, refined over months of experimentation, are what elevate this recipe from good to truly exceptional. Even if you have a cherished homemade dough or sauce recipe, we urge you not to overlook these crucial assembly and cooking steps.
For this recipe, you’ll be utilizing both your stovetop and oven to achieve that perfect crispy crust and beautifully melted cheese. Before you begin the assembly process, remember to preheat your oven broiler to high heat.
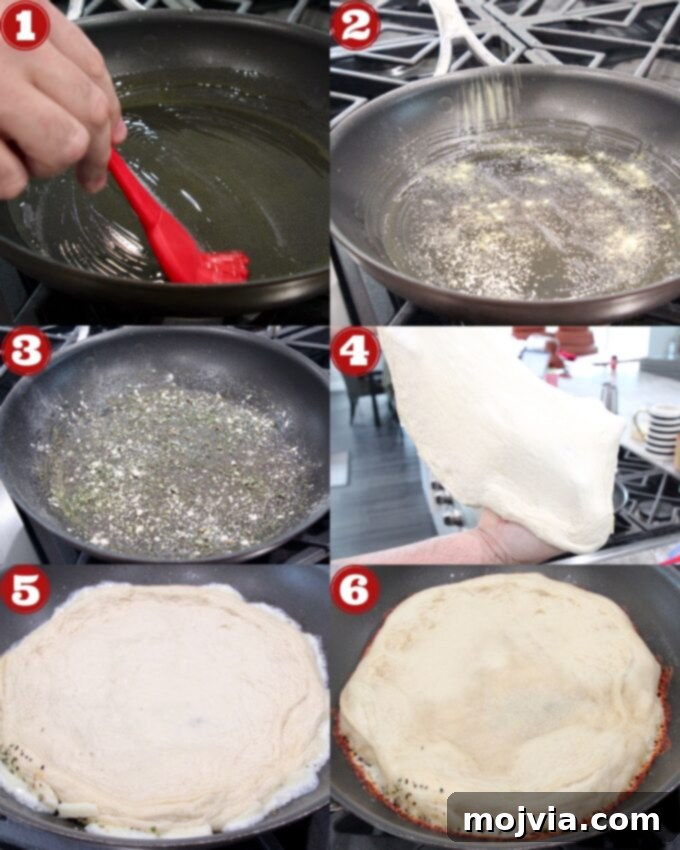
- Liberally brush olive oil onto the bottom and up the sides of a 12-inch skillet. We initially experimented with a cast iron skillet but discovered that a non-stick skillet works just as effectively and is significantly easier to clean. Feel free to use either, depending on your preference.
- Evenly sprinkle a layer of cornmeal across the oiled bottom and up the edges of the pan. This layer of cornmeal is crucial for achieving that characteristic crisp, golden-brown crust and prevents sticking.
- Next, sprinkle our special “hut seasoning mix” generously and evenly across the bottom of the skillet. This mix includes salt, black pepper, garlic powder, onion powder, dried basil, and dried oregano. This unique blend infuses incredible flavor directly into the crust, mimicking those beloved breadstick flavors.
- Using your hands, gently stretch the prepared pizza dough out to approximately 12 inches in width. The goal is to create a disc that fits snugly into your skillet without being forced. Carefully place the stretched pizza dough into the seasoned skillet. Cover the skillet with a clean kitchen towel and allow the dough to rise for another 20-30 minutes. This final proofing in the pan helps create a light and airy interior crust.
- Place the skillet with the dough directly onto a burner on your stovetop. Turn the heat to high and observe the oil around the edges of the dough. You’ll notice it start to bubble. This is the crucial stage where the bottom of the crust begins to crisp up.
- Once the oil actively bubbles, reduce the stovetop heat to medium-high. This prevents the bottom from burning while ensuring consistent crisping. Now, strategically add about half of your sliced mozzarella cheese around the very edges of the pizza dough – this is how you create that coveted crispy cheese ring! Set a timer for 10 minutes. During this time, the cheese around the edge will begin to brown and form that delightful, crispy texture.
Adding Toppings and Finishing the Bake
After the initial stovetop cooking and the cheese ring has begun to form, it’s time to move to the oven for the final magic:
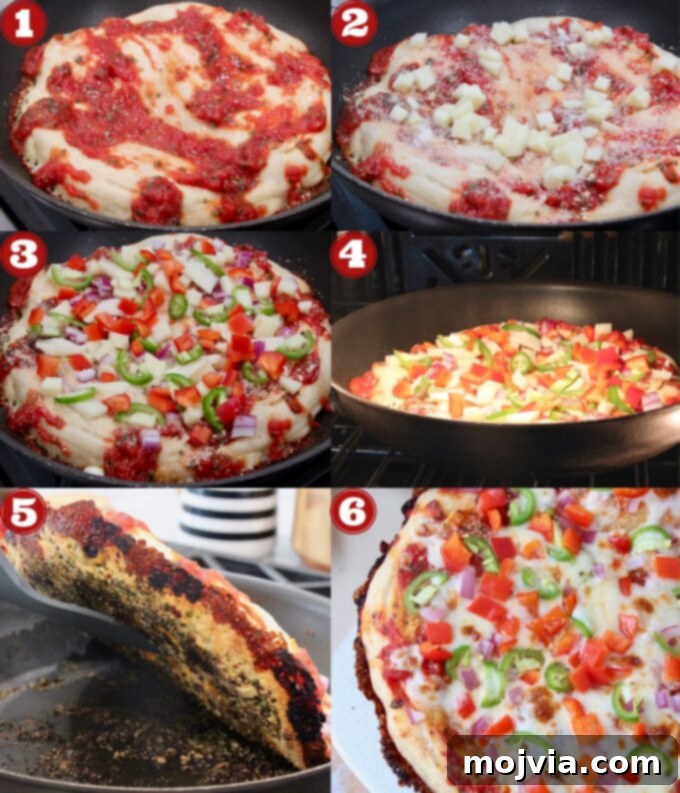
- When your stovetop timer reaches 8-9 minutes, carefully spread your homemade pizza sauce evenly over the partially cooked pizza dough. Immediately follow by sprinkling a layer of grated Parmesan cheese over the sauce.
- Once the 10-minute timer for the stovetop cooking is complete, turn off the burner. Now, evenly distribute the remaining low-moisture mozzarella cheese over the sauce and Parmesan. This will be the main, gooey cheese layer on your pizza.
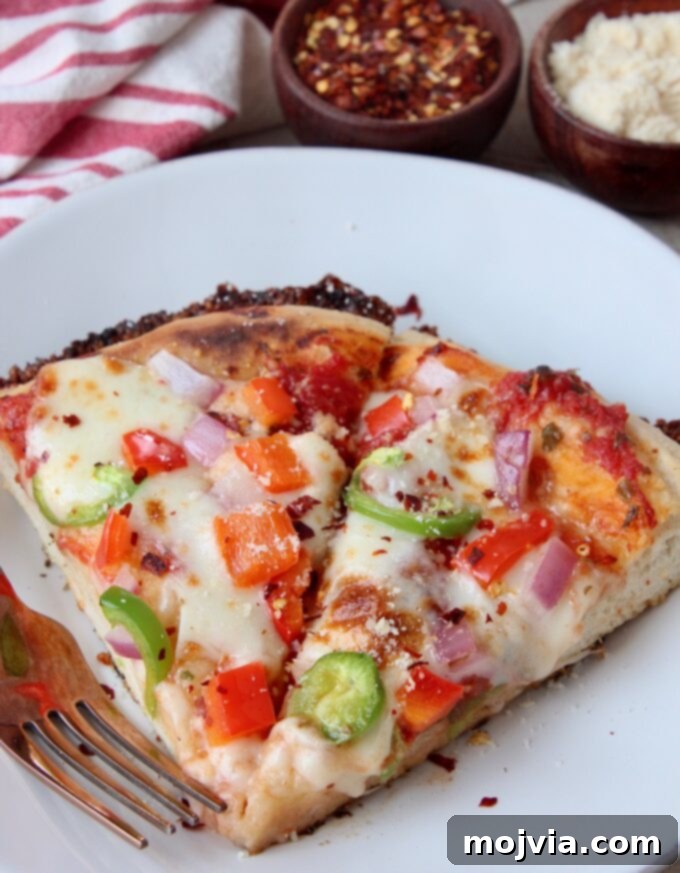
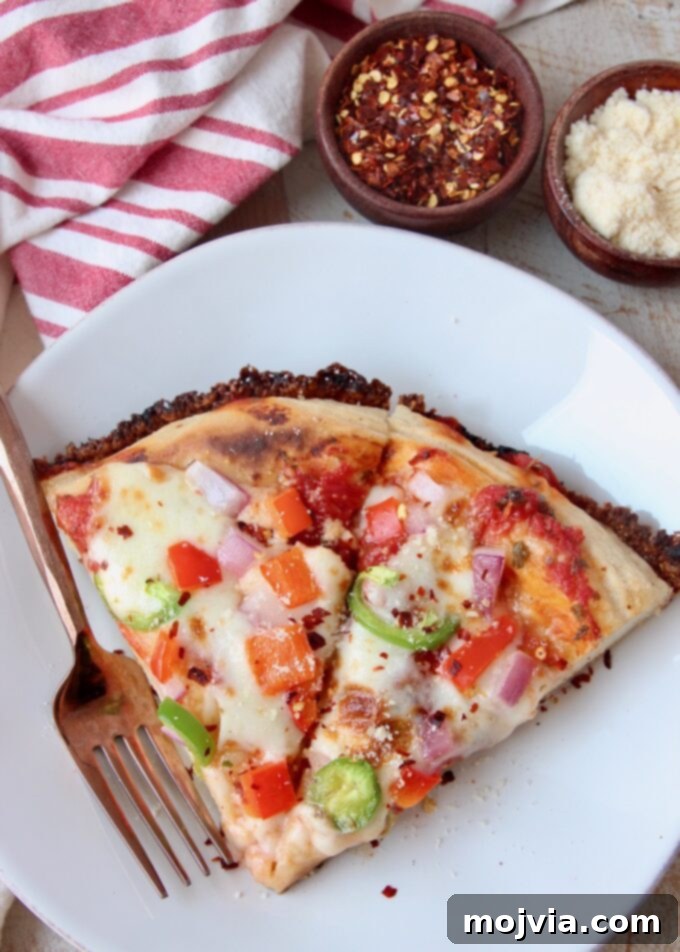
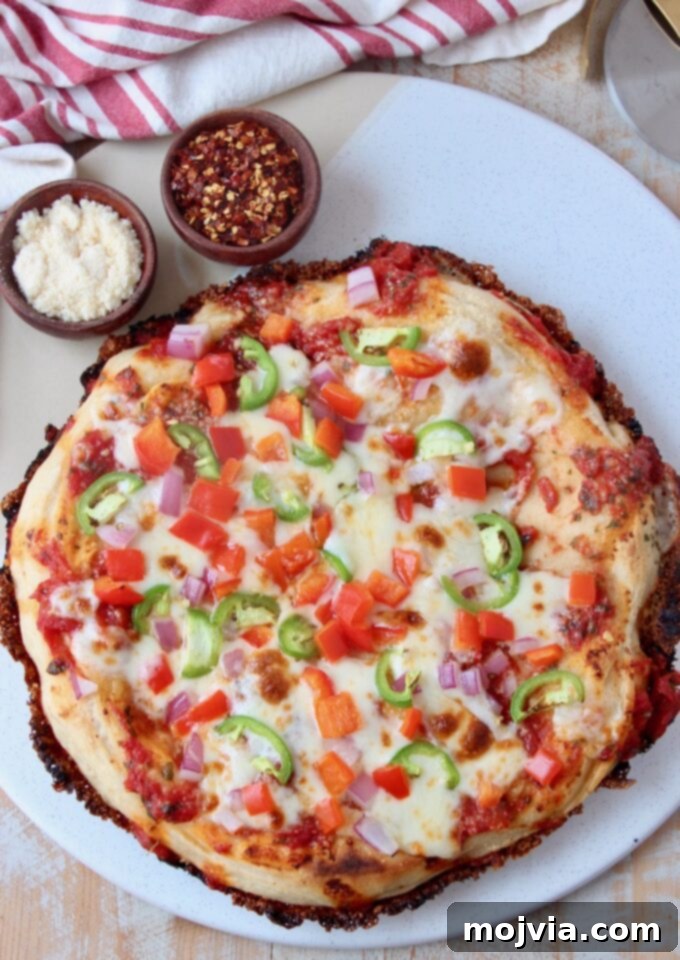
- Add your preferred toppings. For our demonstration, we love a vibrant mix of diced red bell pepper, thinly sliced jalapeños, and diced red onion. Remember to spread toppings evenly to ensure even cooking and prevent soggy spots.
- Carefully transfer the skillet with your topped pizza to the oven. Place it on the middle rack directly under the preheated broiler. Broil the pizza for approximately 2 minutes, or until the cheese on top turns a beautiful golden brown and begins to bubble invitingly. Keep a close eye on it, as broilers can work very quickly!
- As soon as the cheese is perfectly browned and bubbly, remove the pizza from the oven. It is absolutely crucial to **immediately lift the pizza out of the hot skillet**. If left in the pan, the residual heat will continue to cook the crust, potentially leading to overcooking or making it greasy.
- Transfer the piping hot pizza to a sturdy cutting board. Allow it to rest for 3-4 minutes before slicing. This brief resting period is vital, as it allows the molten cheese to set slightly, preventing it from sliding off and ensuring cleaner, more appealing slices.
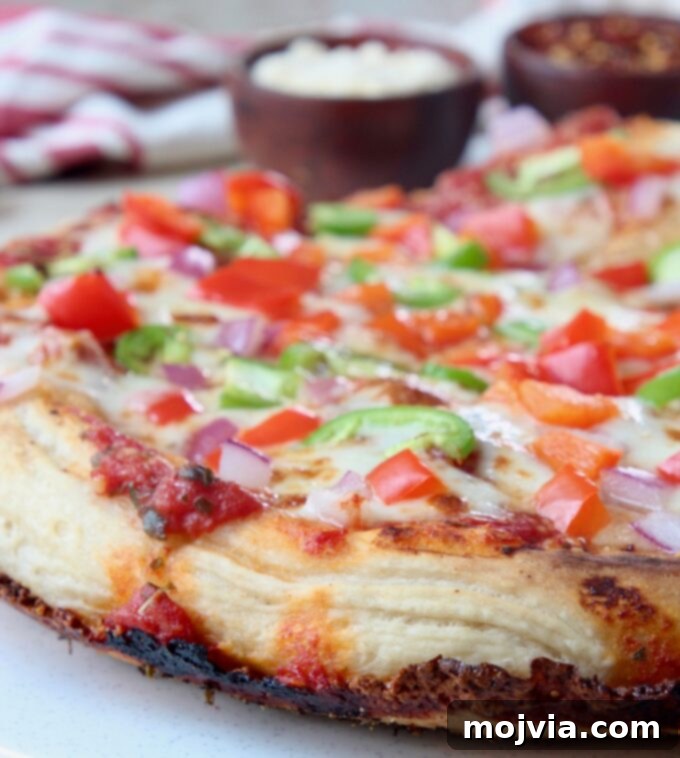
Just look at that magnificent crispy cheese ring around the crust – OMG, pure yum! This golden, crunchy perimeter is what sets Kurt’s Pan Pizza apart and makes it truly special.
Curating the Best Toppings for Your Pan Pizza
After countless pizza nights, we’ve discovered that fresh vegetables are our absolute favorite way to top this pan pizza. Our go-to Friday night combination typically features a colorful medley of diced red bell pepper, thinly sliced jalapeños for a little kick, and finely diced red onions. If we happen to have fresh mushrooms in the fridge, a few sliced mushrooms are a welcome addition. And if there are any leftover garlic sautéed mushrooms, you can bet they’ll find their way onto our pizza!
Tips for Meat Toppings:
Even my parents, who have adopted this recipe for their own Friday night tradition, enjoy topping their pizza with classic pepperoni and bell pepper. For those who love meat toppings but want to avoid a greasy pizza, my parents shared an excellent tip: pre-cook your pepperoni slices! Sauté them in a skillet over medium-high heat for 3-4 minutes per side. This process renders out a significant amount of the grease, ensuring your pizza remains delightfully crisp and flavorful without becoming oily.
Crucial Topping Guidelines for Pan Pizza Perfection:
While almost any of your favorite pizza toppings can be added, it’s essential to follow two critical guidelines to ensure your pan pizza remains perfect:
- **Limit the Quantity:** I strongly recommend **not adding more than 1/2 cup of total toppings** per pizza. Overloading the pizza will weigh down the dough and can lead to a soggy crust in the middle, compromising its structural integrity and texture.
- **Consider Moisture Content:** Opt for ingredients with a naturally low moisture content. High-moisture ingredients, such as certain fresh vegetables (like raw tomatoes or spinach without proper draining) or some fresh cheeses, can release excess water during baking, also contributing to a soggy pizza.
Popular Topping Combinations to Inspire Your Next Pizza Night:
If you’re looking for inspiration, try some of these popular and proven topping combinations. Remember, if adding any meats, always pre-cook them to render out as much grease as possible before adding them to the pizza:
- Classic Veggie: Diced Red Bell Pepper + Sliced Jalapeño + Diced Red Onion (Our family favorite!)
- The Bond Family Favorite: Pepperoni (pre-cooked) + Diced Red Bell Pepper
- Tropical Hawaiian: Diced Pineapple (well-drained) + Canadian Bacon
- Hearty Chicago Style: Italian Sausage (cooked and drained) + Diced Green Bell Pepper + Diced Onion
- The Supreme Delight: Pepperoni (pre-cooked) + Canadian Bacon + Italian Sausage (cooked) + Diced Onions + Diced Green Peppers + Sliced Mushrooms + Black Olives
- Ultimate Meat Lovers: Italian Sausage (cooked) + Pepperoni (pre-cooked) + Ham + Ground Beef (cooked and drained) + Crispy Bacon Bits
- Cheese Lovers Dream: Generous layers of Mozzarella + Parmesan + Herbed Ricotta (For the herbed ricotta, mix fresh basil, parsley, and oregano into whole milk ricotta cheese, then dollop this mixture onto the pizza *after* it has finished baking in the oven for a creamy, fresh finish.)
Expert Tips and Tricks for Pan Pizza Perfection
Achieving pan pizza perfection involves a few key techniques and considerations:
- Never Roll the Pizza Dough: It’s crucial to always use your hands to gently stretch the dough into shape, rather than using a rolling pin. Rolling the dough forces out all the precious air bubbles that contribute to a light and airy texture. Hand stretching preserves these bubbles, resulting in a more tender and delightful crust.
- Always Use Bread Flour for Pizza Dough: Bread flour contains a higher protein content compared to all-purpose flour. This higher protein level is essential for developing more gluten, which gives the dough the necessary elasticity and structure to be stretched thinly without tearing, and to achieve that satisfying chewy texture in the final crust.
- How to Fix a Small Hole in Hand-Stretched Dough: If you accidentally create a small hole while stretching the dough, don’t panic! Simply pinch off a tiny piece of dough from the outside edge or a thicker section and gently press it into the hole, blending it smoothly.
- Avoiding a Greasy Pizza: Two main factors contribute to a greasy pizza. First, remove the pizza from the oven as soon as the cheese turns golden brown and bubbly. Overcooking the cheese will cause it to release excess oils. Second, if you’re using meats like pepperoni or sausage, always pre-cook them thoroughly to render out as much grease as possible before adding them to your pizza.
- Storing Leftover Pan Pizza: Cooked pan pizza, when stored properly in a sealed container, will remain fresh and delicious in the refrigerator for up to 5 days.
- Storing Prepared Pizza Dough: If you’ve made a double batch of dough, the unused portion can be stored in an olive oil-coated airtight container in the refrigerator for up to 2 weeks. This allows for convenient mid-week pizza nights!
Frequently Asked Questions About Pan Pizza
- How many slices does this recipe yield? This recipe typically makes 8 slices of pizza. The slices are designed to be on the smaller side, so we usually recommend planning for 3-4 slices per person to ensure everyone is satisfied.
- Can I use store-bought pizza dough? Absolutely! Most grocery stores offer refrigerated 12-ounce balls of pizza dough, usually found near the deli or bakery section. If using store-bought dough, remember to remove it from the refrigerator at least 30 minutes before you plan to start the recipe. This allows the dough to come to room temperature, making it much easier to stretch and work with.
- What’s the best way to reheat pan pizza? For optimal results, we highly recommend reheating your pan pizza in the oven. This method helps the crust retain its delightful, crispy texture and allows the cheese to melt perfectly. You can place slices on a baking sheet and broil them for 2-3 minutes, or preheat your oven to 350°F (175°C), wrap the pizza in foil, and bake for about 15 minutes. While convenient, reheating in the microwave for 2 minutes will yield a softer crust, but still provides a tasty option.
- Can I freeze the pan pizza dough? Yes, you can! After the second rise and punching down, divide the dough into individual portions. Lightly coat each portion with olive oil, place it in an airtight freezer-safe bag or container, and freeze for up to 3 months. Thaw overnight in the refrigerator, then bring to room temperature before stretching and using.
More Tested and Perfected Italian Recipes From Our Kitchen
If you’ve enjoyed perfecting this pan pizza, you’ll love these other Italian recipes, each meticulously tested and perfected in my kitchen to bring authentic flavors to your table:
- Pasta Boscaiola – A rustic Italian pasta dish with mushrooms and sausage.
- Bolognese Meat Sauce – A rich, slow-simmered meat sauce perfect for any pasta.
- Farmers Market Vegetarian Lasagna – Layers of fresh vegetables and creamy cheese.
- Three Cheese Manicotti with Italian Sausage Marinara – Indulgent stuffed pasta shells.
- Sweet Potato Ravioli – A unique and flavorful twist on traditional ravioli.
- Italian Meatloaf – A savory meatloaf packed with Italian herbs and flavors.
- Slow Cooked Beef Ragu – Tender beef slow-cooked in a rich tomato sauce.
- Loaded Calzone – Made with the very same versatile pizza dough from this recipe!

Print Recipe
Pin Recipe
Rate this Recipe
Ultimate Crispy Cheese Crust Pan Pizza
8
slices
30
12
2
2
42
Whitney Bond
Main Course
Italian
Ingredients
For the Dough
- 10 ounces room-temperature water
- 2 tablespoons olive oil
- 2 teaspoons granulated sugar
- 1 ½ teaspoons salt
- 3 cups + 5 tablespoons bread flour
- ½ teaspoon active dry yeast
For the Sauce
- 3 San Marzano peeled tomatoes (from a can)
- ½ tablespoon olive oil
- ½ teaspoon salt
- 1 teaspoon granulated sugar
- 1 tablespoon fresh basil leaves, or 1 teaspoon dried basil
- 1 tablespoon fresh oregano, or 1 teaspoon dried oregano
For the Pizza Assembly
- 1 tablespoon olive oil (for the pan)
- 1 teaspoon cornmeal
- ¼ teaspoon salt (for pan seasoning)
- ¼ teaspoon ground black pepper
- ¼ teaspoon garlic powder
- ¼ teaspoon onion powder
- ½ teaspoon dried basil
- ½ teaspoon dried oregano
- 6-8 ounces low moisture mozzarella cheese, sliced into small cubes and slim strips
- 2 tablespoons grated Parmesan cheese
Suggested Toppings (Adjust to preference)
- 2 tablespoons diced red onion
- 2 tablespoons diced red bell pepper
- ½ jalapeño, thinly sliced
Instructions
Preparing the Dough
-
The dough can be prepared using a bread machine, a stand mixer, or a bowl with an electric hand mixer. Choose your preferred method.
-
**For a bread machine:** Add all dough ingredients to the machine, select the pizza dough setting, and start. After the cycle, remove the dough, place it in an oiled bowl, cover, and let rest for 1-8 hours.
-
**For a stand mixer or electric hand mixer:**
- Add bread flour, salt, sugar, yeast, olive oil, and 5 ounces of water to your mixer bowl.
- Use a dough hook (stand mixer) or dough attachments (hand mixer) to combine for 2 minutes.
- Add the remaining 5 ounces of water and mix on medium speed for 15 minutes to develop gluten.
- Cover the bowl and let the dough rest for 1 hour, or until doubled in size.
- Gently punch down the dough, then fold it in half, repeating this six times.
- Cover again and let rest for a minimum of 1 hour, or up to 8 hours, in a warm place.
-
This recipe yields enough dough for two pizzas. Divide the dough in half. If making only one pizza, store the other half in an oiled, airtight container in the refrigerator for up to two weeks.
Crafting the Sauce
-
Remove three whole San Marzano tomatoes from their can and use your hands to crush them into a bowl.
-
Add the fresh basil, oregano, salt, sugar, and olive oil to the crushed tomatoes. Combine all ingredients thoroughly and set aside.
Assembling and Baking the Pan Pizza
-
Preheat your oven broiler to high.
-
Brush 1 tablespoon of olive oil generously into the bottom and up the sides of a 12-inch non-stick or cast iron skillet.
-
Evenly sprinkle 1 teaspoon of cornmeal over the olive oil, covering the bottom and edges of the pan.
-
Sprinkle the pan seasoning mix (salt, black pepper, garlic powder, onion powder, dried basil, dried oregano) evenly into the bottom of the skillet.
-
Use your hands to gently stretch the pizza dough out to about 12 inches wide, then carefully place it into the seasoned skillet.
-
Cover the skillet with a clean kitchen towel and allow the dough to rise for an additional 20-30 minutes.
-
Place the skillet with the dough onto a burner on your stovetop. Turn the stove to high heat and wait for the oil to begin bubbling around the edges of the dough.
-
Once the oil bubbles, reduce the heat to medium-high. Add about half of your mozzarella cheese (in slim strips) around the edges of the crust to form the crispy cheese ring. Set a timer for 10 minutes.
-
After 8-9 minutes on the stovetop, spread the prepared pizza sauce evenly over the dough, then sprinkle with grated Parmesan cheese.
-
When the 10-minute stovetop timer is up, turn off the heat. Evenly distribute the remaining cubed mozzarella cheese and your chosen toppings across the pizza.
-
Carefully transfer the skillet to the oven, placing it under the broiler on the middle rack. Broil for 2 minutes, or until the cheese is golden brown and bubbly. Watch closely to prevent burning.
-
Remove the pizza from the oven and, crucially, immediately lift the pizza out of the hot skillet. If left in the pan, it will continue to cook and may become greasy.
-
Transfer the hot pizza to a cutting board. Allow it to rest for 3-4 minutes before slicing. This allows the cheese to set, making for cleaner cuts and a better eating experience.
Notes
- **Nutritional information:** The provided nutritional information is for one slice of pizza, calculated using one pizza dough, 6 ounces of mozzarella cheese, with onion, bell pepper, and jalapeños as toppings.
- **Topping Quantity & Moisture:** Feel free to customize toppings, but do not exceed 1/2 cup total toppings to avoid a soggy crust. Prioritize low-moisture ingredients.
- **Dough Handling:** Always stretch dough by hand; never roll it, as rolling pushes out essential air, leading to a tough crust.
- **Bread Flour:** Use bread flour for superior gluten development, providing necessary elasticity and a light, airy texture.
- **Fixing Dough Holes:** If a small hole forms during stretching, simply pinch off a small piece from the edge and gently press it into the hole.
- **Preventing Greasy Pizza:** Remove pizza immediately from the oven when cheese browns. Pre-cook and drain any fatty meats like pepperoni or sausage before adding them.
- **Storage:** Leftover pan pizza stays fresh in the refrigerator for up to 5 days in a sealed container. Prepared dough lasts up to 2 weeks in the refrigerator.
- **Store-Bought Dough:** If using, let it come to room temperature for at least 30 minutes before stretching.
- **Reheating:** For best results, reheat in the oven (broiler for 2-3 mins or 350°F wrapped in foil for 15 mins). Microwave reheating for 2 minutes is also an option.
Nutrition Facts
Calories
198
kcal
(10%)
Carbohydrates
21
g
(7%)
Protein
9
g
(18%)
Fat
9
g
(14%)
Saturated Fat
3
g
(15%)
Cholesterol
11
mg
(4%)
Sodium
583
mg
(24%)
Potassium
114
mg
(3%)
Fiber
1
g
(4%)
Sugar
2
g
(2%)
Vitamin A
334
mg
(7%)
Vitamin C
11
mg
(13%)
Calcium
177
mg
(18%)
Iron
1
mg
(6%)
Did you make this recipe?
Tag @WhitneyBond on Instagram and hashtag it #WBRecipes!