

Discover the secret to the BEST Gluten Free Sugar Cookies with our cherished family recipe, lovingly perfected and passed down through three generations! These delightful cut-out cookies are celebrated for their irresistibly thin and crispy texture, making them a joy to bake and beautifully simple to decorate with our signature 3-ingredient confectioners’ icing.
While these exquisite gluten-free sugar cookies are an absolute must-have for Christmas celebrations, their versatility shines all year round. Imagine preparing a batch of this pliable dough and cutting them into charming festive shapes for Valentine’s Day, patriotic stars for the 4th of July, spooky silhouettes for Halloween, or simply classic circles for a sweet treat to brighten any ordinary day. Each bite promises a taste of tradition, reinvented for modern dietary needs without sacrificing an ounce of flavor or fun.

Table of contents
- The Heart of Our Gluten-Free Sugar Cookies
- Essential Ingredients for Perfect GF Sugar Cookies
- Step-by-Step Baking Instructions
- Crafting the Perfect Confectioners’ Icing
- Icing Troubleshooting and Tips
- Expert Tips for Gluten-Free Sugar Cookie Success
- More Beloved Family Recipes
The Heart of Our Gluten-Free Sugar Cookies
Few things evoke the warmth and joy of the holiday season quite like my Mom’s legendary sugar cookies. The act of gathering around the kitchen table, first to mix and roll the dough, then to painstakingly decorate each cookie, creates a tapestry of cherished holiday memories that I hold dear. These aren’t just cookies; they’re edible pieces of family history, filled with laughter and love, symbolizing connection and togetherness that truly define the spirit of celebration.
Our family’s journey with this classic recipe took an unexpected turn in 2010 when my brother was diagnosed with a gluten allergy. This posed a delightful challenge: how could we adapt our beloved generational recipe to be completely gluten-free without losing any of its magical flavor or characteristic crispy texture? After much experimentation and dedication, exploring various gluten-free flour blends and adjusting ratios, we finally perfected a gluten-free version that truly stands the test of taste. To this day, no one has ever been able to tell the difference! They possess the same delicate sweetness and satisfying crispness as the original, but with the added benefit of being entirely gluten-free, ensuring everyone can partake in our family tradition, especially during those precious holiday moments.
This commitment to gluten-free baking means that these cookies aren’t just a substitute; they’re a revelation. They prove that you don’t have to compromise on taste, texture, or tradition when catering to dietary needs. Every year, seeing these beautifully decorated cookies on our holiday platters brings immense joy, knowing that a recipe loved for generations continues to be enjoyed by all, making new memories while honoring old ones. These thin and crispy gluten-free cut-out sugar cookies are a testament to how traditional flavors can evolve to be inclusive and equally delicious.
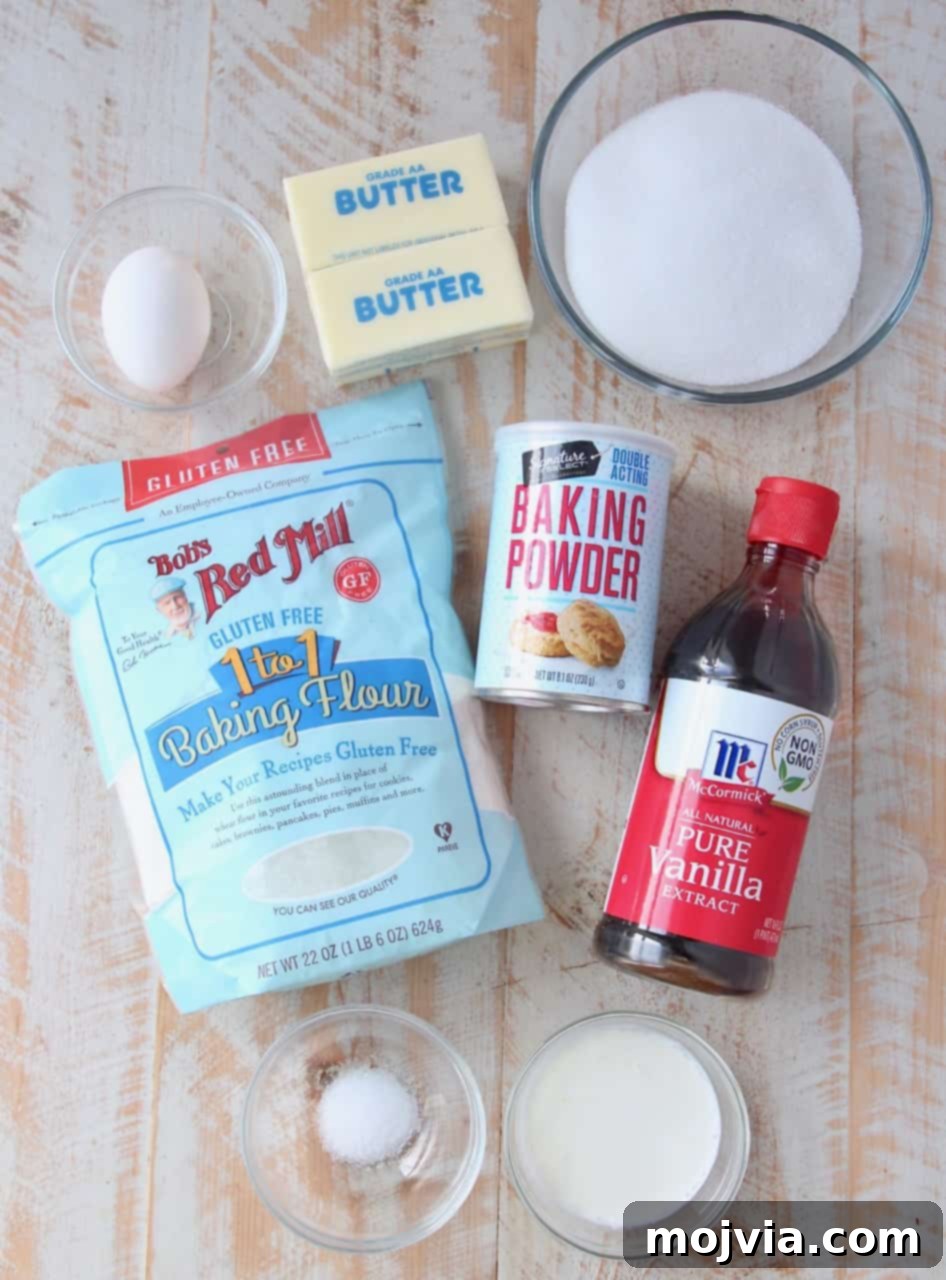
Essential Ingredients for Perfect GF Sugar Cookies
Creating the ultimate gluten-free sugar cookies begins with selecting the right ingredients. Each component plays a vital role in achieving that perfect balance of flavor and texture, resulting in a cookie that is both tender and wonderfully crispy. Here’s what you’ll need to gather to bake these delightful treats:
- Gluten-Free Flour Blend: This is the cornerstone of our recipe and key to baking the best gluten-free sugar cookies. It’s absolutely crucial that your chosen gluten-free flour blend contains xanthan gum. Xanthan gum acts as a binder, mimicking the elasticity and structure typically provided by gluten, which is essential for preventing crumbly cookies and ensuring a smooth, pliable dough. If your chosen blend does not include it, simply add 1/2 teaspoon of xanthan gum to the dry ingredients for every 3 cups of flour. We enthusiastically recommend Bob’s Red Mill Gluten Free 1-to-1 Baking Flour. It’s an excellent cup-for-cup substitute for traditional all-purpose flour and has consistently delivered outstanding results in our gluten-free baking endeavors. This specific blend typically features a thoughtful combination of rice flour, tapioca flour, sorghum flour, and, crucially, xanthan gum, ensuring a reliably delicious outcome every time.
- Baking Powder: A fresh leavening agent that helps the cookies achieve a slight, delicate lift during baking and contributes significantly to their desirable crispy edge. Always check the expiration date to ensure it’s active for optimal results.
- Salt: A small amount of salt is vital for balancing the intense sweetness of the sugar and enhancing all the other subtle flavors in the cookie dough. It brings out the depth of the vanilla and butter. Don’t skip this important flavor enhancer!
- Unsalted Butter: Using unsalted butter allows you to precisely control the overall salt content in the recipe, ensuring consistent flavor. Make sure it’s at true room temperature – soft enough to make an indentation with your finger but still cool to the touch. This consistency is perfect for easy creaming with the sugar, which creates a light and airy base for your cookie dough.
- Granulated Sugar: Provides the classic sweetness that defines sugar cookies and plays a critical role in developing the signature thin and crispy texture of these cut-out cookies. It caramelizes slightly as it bakes, contributing to the golden-brown edges.
- Large Egg: The egg acts as a crucial binder, helping to hold all the ingredients together and adding richness and structure to the dough. It also contributes to a tender crumb. Ensure your egg is at room temperature; this helps it emulsify better with the butter and sugar mixture, resulting in a smoother dough.
- Milk: A small amount of milk (dairy or your preferred non-dairy alternative) adds just enough moisture to the dough, ensuring it remains pliable, easy to roll out without cracking, and contributes to the cookies’ delicate texture.
- Pure Vanilla Extract: The star flavor component! Good quality pure vanilla extract adds warmth, a fragrant aroma, and significant depth, elevating the simple sugar cookie taste to something truly special. Always invest in pure vanilla for the best, most authentic flavor profile.
Having these ingredients measured and prepped, ideally at room temperature where specified, will make your gluten-free sugar cookie baking experience smooth, efficient, and enjoyable, setting you up for delicious success with every batch.
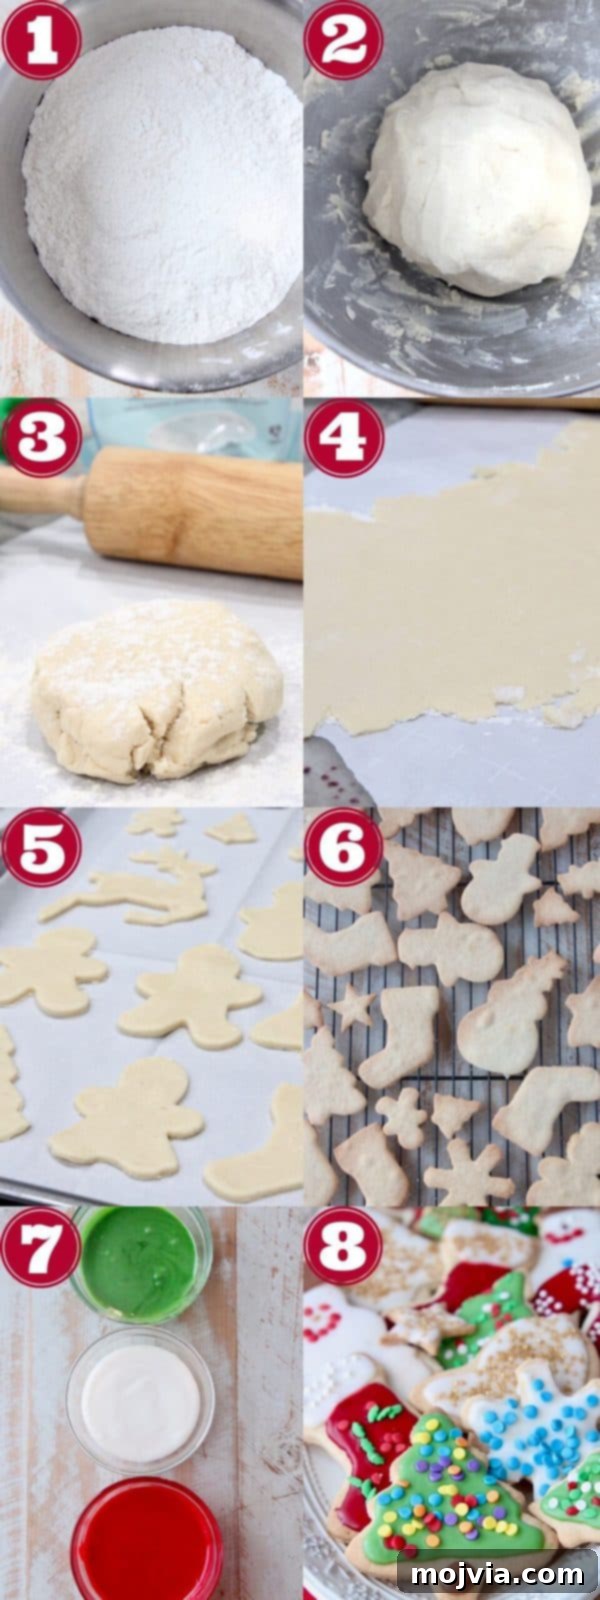
Step-by-Step Baking Instructions
Follow these detailed steps to create perfectly crispy and delicious gluten-free sugar cookies that everyone will love. Precision and a little patience are key to mastering this generational recipe and achieving that sought-after thin and crispy texture. Prepare to fill your home with the sweet aroma of freshly baked cookies!
- Prepare Dry Ingredients: In a medium-sized mixing bowl, meticulously whisk together the gluten-free flour blend (double-checking that it contains xanthan gum, or adding it as specified in the ingredients list), baking powder, and salt. Thoroughly combine these dry ingredients to ensure even distribution. This prevents pockets of leavening or salt, guaranteeing a consistent cookie every time. Set the bowl aside for later use.
- Cream Butter and Sugar: In a large mixing bowl, or the bowl of a stand mixer fitted with the paddle attachment, add the softened, room-temperature unsalted butter and granulated sugar. Cream these two ingredients together on medium speed for a full 2 minutes. This step is crucial for incorporating air into the mixture, which contributes significantly to the cookies’ light, delicate, and ultimately crispy texture. The mixture should become noticeably lighter in color and fluffy in consistency.
- Incorporate Wet Ingredients: To the beautifully creamed butter and sugar mixture, add the room-temperature large egg, milk, and pure vanilla extract. Continue mixing on medium speed until all these wet ingredients are fully combined and the mixture appears smooth and homogenous. Remember to scrape down the sides of the bowl as needed with a rubber spatula to ensure all ingredients are thoroughly incorporated.
- Combine Wet and Dry: Gradually add the reserved flour mixture to the wet ingredients in the mixer. Begin mixing on the lowest speed possible until the dry ingredients are just combined with the wet, and a cohesive dough begins to form. It’s important not to overmix at this stage, as excessive mixing can develop any residual proteins in the gluten-free flour, potentially leading to tougher cookies. Stop as soon as the dough comes together.
- Chill the Dough: Gently gather the cookie dough into a cohesive ball. Wrap it tightly in plastic wrap or place it in an airtight container. Transfer the dough to the refrigerator and chill for a minimum of 15 minutes. This chilling period is essential; it helps the dough firm up, making it much easier to roll and cut precise shapes. It also prevents the cookies from spreading too much during baking, ensuring they retain their delightful cut-out forms.
- Prepare for Rolling: Preheat your oven to 400°F (200°C). While the oven heats, lightly dust a large, clean sheet of parchment paper with extra gluten-free flour. Take about 1/4 of the chilled cookie dough and place it onto the floured parchment paper. Lightly dust the top of this dough portion with more gluten-free flour.
- Roll the Dough Thin: Cover the floured dough with another sheet of parchment paper. Using a sturdy rolling pin, roll the dough evenly to an approximate thickness of 1/8 inch. This precise thickness is vital for achieving the signature thin and crispy sugar cookies. Don’t be afraid to roll them quite thin! This specific quality sets them apart.
- Cut Out Shapes: Carefully remove the top layer of parchment paper. Use your favorite cookie cutters to press firmly into the dough and cut out desired shapes. For intricate cutters, gently twist them to ensure a clean cut. Carefully transfer the cut-out cookies to a baking sheet that has been lined with parchment paper or a baking stone, leaving a small space (about 1 inch) between each cookie to allow for slight expansion. Re-roll any dough scraps gently, re-chill if it becomes too soft, and repeat the cutting process until all dough is used.
- Bake to Perfection: Place the baking sheet with the cookies into the preheated 400°F (200°C) oven. Bake for a precise 5-8 minutes. Baking times can vary significantly depending on your specific oven’s calibration and whether you’re using a lighter baking sheet or a denser baking stone. Crucially, keep a close eye on them, especially during the last minute or two. The cookies are perfectly done when their edges are just lightly golden brown.
- Cool Completely: As soon as the cookies come out of the oven, immediately and carefully transfer them from the hot baking sheet to a wire cooling rack. This critical step prevents them from continuing to bake on the hot sheet and ensures they achieve their desired crispness. Allow them to cool completely, to room temperature, before attempting to decorate them.
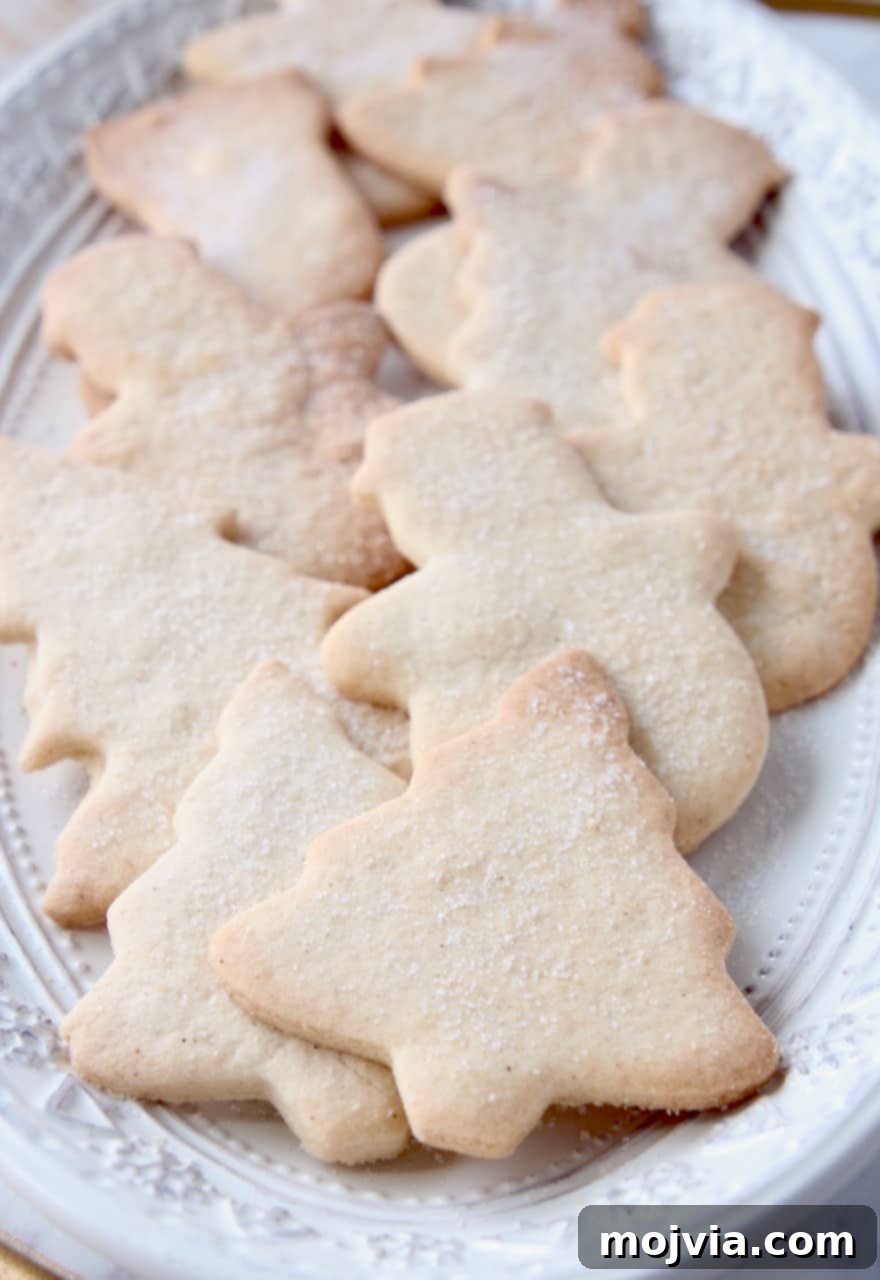
- Repeat and Decorate: Continue repeating steps 6-10 with the remaining cookie dough until all your delightful gluten-free sugar cookies are baked. Once completely cooled, you have options for finishing them: either lightly dust them with granulated sugar for a simple, elegant finish, or prepare the easy 3-ingredient confectioners’ icing (find the recipe below) to decorate them with vibrant colors and designs. Get creative with sprinkles and colors – as my niece always enthusiastically says, “the more sprinkles, the better!”
Crafting the Perfect Confectioners’ Icing
This simple, yet delicious, 3-ingredient confectioners’ icing is the ideal accompaniment to our crispy gluten-free sugar cookies. It’s incredibly easy to prepare and provides a smooth, sweet finish that’s perfect for decorating with precision and flair. Follow these steps for a beautiful, versatile icing.
- Sift Sugar: Begin by adding 4 cups of meticulously sifted confectioners’ sugar (also widely known as powdered sugar or icing sugar) to a large mixing bowl. Sifting is an absolutely vital step here; it removes any stubborn lumps and aerates the sugar, ensuring a perfectly smooth, velvety icing texture that won’t clog your piping bag or spread unevenly.
- Add Flavor and Liquid: Pour in 2 teaspoons of pure vanilla extract for that classic, comforting flavor that complements the sugar cookies so well. Next, add 1/4 cup of milk (any kind works, whether dairy or a non-dairy alternative). The milk helps achieve the desired liquid consistency for easy spreading or piping.
- Mix Until Smooth: Using a sturdy rubber spatula or a whisk, thoroughly mix all the ingredients together. Continue stirring diligently until the icing is completely smooth, creamy, and gloriously free of any lumps. It should possess a consistency that is thick enough to hold its shape when piped onto a cookie or smoothly spread with a knife, but still flow easily.
- Color and Flavor (Optional Enhancements): If you wish to create a dazzling array of colorful cookies, divide the prepared white icing into 3-4 separate bowls. Add 2-3 drops of your favorite gel or liquid food coloring to each bowl, mixing well to achieve vibrant, uniform hues. For a rich, chocolatey twist, you can also stir in a tablespoon or two of unsweetened cocoa powder to one of the bowls to create a delightful chocolate-brown frosting, perfect for adding variety to your cookie platters.
This versatile confectioners’ icing not only sets beautifully, allowing your intricate decorations to stay perfectly put, but it also adds another wonderful layer of sweetness and visual appeal to every single bite of your gluten-free sugar cookies.

Icing Troubleshooting and Tips
Even with a simple recipe, sometimes a little adjustment is needed to get the perfect icing consistency. Environmental factors like humidity or slight variations in ingredient measurements can affect the outcome. Here are some essential tips to help you troubleshoot and master your confectioners’ icing for flawlessly decorated gluten-free sugar cookies:
- If the icing becomes too thick and hard to spread on the cookies: This is a common issue, especially if you’re working in a dry environment or your initial measurements were slightly off. To achieve a smoother, more spreadable consistency, add more milk, but do so very gradually and with caution. Start with just 1 teaspoon at a time, mixing thoroughly after each addition until you reach your desired spreadable consistency. It’s always easier to add more liquid than to attempt to fix overly runny icing.
- If the icing becomes too runny, add more powdered sugar: The opposite problem can occur if you’ve added too much milk initially or if you’re baking in a particularly humid environment. If your icing is too thin and won’t hold its shape, you’ll need to thicken it. Gradually add more sifted powdered sugar, about 1/4 cup at a time. Mix it in completely, ensuring no lumps remain, before assessing the consistency and adding more if necessary. Continue this process until the icing is thick enough to coat the back of a spoon and hold its shape effectively for decorating.
- The importance of sifting powdered sugar: Sifting is an absolutely critical step for achieving a lump-free, impeccably smooth icing. Powdered sugar often clumps due to moisture, and these lumps will make your icing uneven and difficult to work with. You have a couple of options for sifting: you can use a traditional flour sifter, which works efficiently and quickly. Alternatively, a fine mesh strainer and a spoon can also do the trick; simply push the sugar through the mesh with the back of the spoon.
- Precise measurement of sifted confectioners’ sugar: It’s important to note that the recipe specifically calls for 4 cups of *sifted* confectioners’ sugar. This means you should sift the sugar *first* into a separate bowl to remove all lumps and then measure out the exact 4 cups from the sifted pile. Measuring unsifted sugar can lead to an inaccurate volume due to air pockets and compaction, often resulting in an icing that is too runny. Taking this extra step ensures the most precise measurements and a perfect, consistent icing every single time you make these gluten-free sugar cookies.

Expert Tips for Gluten-Free Sugar Cookie Success
Achieving bakery-quality gluten-free sugar cookies, especially those thin and crispy cut-out varieties, is easier than you think with these expert tips and tricks. These insights, gleaned from years of family baking and adapting to gluten-free needs, will help you master every step of the process, ensuring your holiday cookies or everyday treats are nothing short of perfect:
- Preparing the Dough in Advance for Optimal Results: One of the best ways to streamline your holiday baking process and reduce stress is to prepare the sugar cookie dough ahead of time. The dough can be made up to 3 days in advance. Once prepared, wrap it tightly in plastic wrap or place it in an airtight container to prevent it from drying out, and store it in the refrigerator. If the dough has been refrigerated for longer than an hour, it will become quite firm. Be sure to remove it from the refrigerator at least 15 minutes before you plan to roll it out. This crucial step allows it to soften slightly, making it much easier to work with, preventing cracks when rolling, and ensuring a smooth, even surface for your cookies.
- Achieving the Ideal Dough Thickness: The Secret to Crispiness: You might raise an eyebrow at this, but yes, the recipe explicitly states to roll the dough to an approximate thickness of 1/8 inch! This specific, thin thickness is the undeniable key to achieving the signature thin and crispy texture that makes these gluten-free sugar cookies so beloved and addictive. Don’t be tempted to roll them any thicker, or you’ll inadvertently end up with softer, more cake-like cookies instead of the desired delicate crispness. Roll with confidence and embrace the thinness!
- Mastering Baking Times: Quick and Vigilant Baking: Gluten-free cookies can sometimes bake faster than their traditional counterparts, and their thinness makes these even quicker. When baking on a standard metal baking sheet lined with parchment paper, these cookies typically bake in about 5 minutes. If you’re using a baking stone, which absorbs and retains heat differently, it might take a bit longer, usually around 8 minutes. Regardless of your equipment, I highly recommend keeping a vigilant eye on your cookies during the last 1-2 minutes of the baking process. The moment the edges just begin to turn a light golden brown, almost imperceptibly, it’s time to remove them from the oven. Over-baking even slightly can lead to overly hard or burnt cookies, so precision and quick action here are paramount for perfectly crispy results.
- Effortless Cookie Cutting: Tools for Intricate Shapes: For a smooth and frustration-free cookie-cutting experience, always keep a thin butter knife and a few sturdy toothpicks handy at your workstation. Toothpicks are invaluable for gently nudging out smaller, more intricate pieces of dough from detailed cookie cutters, such as the delicate antlers on a reindeer, tiny stars, or other holiday figures, without distorting their shape. If the cut dough begins to stick stubbornly to the parchment paper after cutting, simply slide the thin edge of a butter knife gently underneath the cut-out shape. This helps to lift it cleanly and easily transfer it to your baking sheet without damaging its perfect form.
- Proper Flour Dusting for Non-Stick Success: When rolling out gluten-free dough, you’ll find that it can be a bit more prone to sticking to your work surface or rolling pin than traditional wheat-based dough due to the lack of gluten structure. Therefore, always ensure you have a generous supply of extra gluten-free flour on hand to continuously dust both your work surface and the dough itself as you roll it. This vigilant dusting prevents sticking, makes the rolling process a breeze, and significantly simplifies the cookie-cutting and transfer process. As a practical reference, between the initial dough preparation and the frequent flouring of surfaces, I often use almost an entire 22-ounce bag of gluten-free flour for one large batch of these cookies.
- Quick Tip! Alternative Dusting Agent: If you unexpectedly run low on your gluten-free flour in the middle of a baking session while rolling out your cookie dough, don’t panic! Cornstarch makes an excellent and readily available substitute for dusting your work surface. It helps prevent sticking just as effectively without imparting any noticeable taste or altering the delightful texture of your delicious gluten-free sugar cookies.
By diligently following these detailed tips and tricks, you’re well on your way to creating stunning, delicious, and perfectly textured gluten-free cut-out sugar cookies that will impress everyone, proving that gluten-free baking can be both easy and incredibly rewarding.

More Beloved Family Recipes
The joy of sharing food and traditions runs deep in our family! Beyond these amazing gluten-free sugar cookies, we’re excited to share more cherished recipes from my Grandma, Mom, and Dad. These are the classic, comforting dishes that have brought our family together for generations and continue to create lasting memories around the table, proving that good food is truly a bond.
- Dad’s Famous Red Sangria: A refreshing and vibrant fruit-infused drink, perfect for any gathering and a surefire crowd-pleaser.
- Mom’s Classic Cherry Pie: A sweet and tangy dessert, a true testament to homemade goodness with a flaky crust and rich cherry filling.
- Dad’s Unique Captain Crunch Fried Chicken: An unexpected culinary adventure, offering a delightfully crispy and uniquely flavored coating.
- Meme’s Nostalgic Cherry Coke Jello Salad: A fun and retro side dish that always brings a smile and a touch of vintage charm to any meal.
- Dad’s Signature BBQ Baked Beans: The perfect savory, smoky, and slightly sweet accompaniment to any barbecue or family meal.
- Mom’s Delightful Strawberry Mini Pies: Individual portions of a beloved classic, bursting with fresh berry flavor and perfect for springtime.
And for another fantastic holiday treat or delightful snack, don’t miss our family friend Barb’s famous Peanut Brittle recipe. It’s also naturally gluten-free and makes for an excellent edible gift or a delightful crunchy addition to your festive dessert spread!

Print Recipe
Pin Recipe
Rate this Recipe
Gluten Free Sugar Cookies
Ingredients
For the Gluten Free Sugar Cookies
- 3 cups gluten-free flour blend, ensure it contains xanthan gum, plus extra for dusting (see notes below)
- 1 ½ teaspoons baking powder
- ½ teaspoon salt
- 1 cup unsalted butter, at room temperature
- 1 cup granulated sugar
- 1 large egg, room temperature
- 3 tablespoons milk, any kind, room temperature
- 2 teaspoons pure vanilla extract
For the Confectioners Icing
- 4 cups sifted confectioners’ sugar, also known as powdered sugar or icing sugar
- 2 teaspoons pure vanilla extract
- ¼ cup milk, adjust as needed for desired consistency
- food coloring, optional, for vibrant decorations
Instructions
Gluten Free Sugar Cookies
-
Preheat your oven to 400°F (200°C). Prepare baking sheets by lining them with parchment paper for easy cleanup and non-stick baking.
-
In a medium mixing bowl, whisk together the gluten-free flour blend, baking powder, and salt until thoroughly combined. Set this dry mixture aside.
-
In a large mixing bowl, or the bowl of a stand mixer with a paddle attachment, cream together the room-temperature unsalted butter and granulated sugar on medium speed for 2 minutes until the mixture is light, fluffy, and well aerated.
-
Add the room-temperature egg, milk, and pure vanilla extract to the creamed mixture. Continue mixing until all wet ingredients are fully incorporated and the mixture is smooth.
-
Gradually add the reserved dry flour mixture to the wet ingredients. Mix on low speed until just combined and a cohesive dough forms. Be careful not to overmix.
-
Form the dough into a ball, wrap it tightly in plastic wrap, and refrigerate for 15 minutes to chill. This step helps the dough firm up, making it easier to handle and roll.
-
Lightly dust a sheet of parchment paper with gluten-free flour. Place about 1/4 of the chilled dough onto it, and lightly dust the top of the dough with more GF flour.
-
Cover the dough with another sheet of parchment paper and use a rolling pin to roll it evenly to 1/8 inch thickness. Achieving this thinness is crucial for crispy cookies.
-
Remove the top parchment. Use cookie cutters to cut shapes from the dough. Carefully transfer the cut-out cookies to the prepared baking sheet, leaving a small space between them.
-
Bake in the preheated oven for 5-8 minutes, or until the edges are lightly golden brown. Baking times vary, so watch closely during the last couple of minutes to prevent over-baking.
-
Immediately remove cookies from the hot baking sheet and transfer them to a wire cooling rack to cool completely. This helps achieve and maintain their crispness.
-
Repeat steps 6-10 with the remaining dough until all cookies are baked and cooled. Re-chill dough scraps if they become too warm to handle.
-
Once completely cooled, decorate the cookies with a light dusting of granulated sugar for a simple finish, or with the prepared confectioners’ icing (see recipe below) for more elaborate designs.
Confectioners Icing
-
Add 4 cups of thoroughly sifted confectioners’ sugar to a large mixing bowl. Sifting is crucial for a smooth icing.
-
Stir in 2 teaspoons of pure vanilla extract and 1/4 cup of milk.
-
Using a rubber spatula, mix until the icing is completely smooth and creamy. Adjust consistency by adding more milk (1 tsp at a time) or powdered sugar (1/4 cup at a time) as needed.
-
To make colored icing, divide into separate bowls and add 2-3 drops of food coloring, mixing well until the desired hue is achieved. For chocolate icing, stir in unsweetened cocoa powder.
Notes
- Gluten-Free Flour: It’s essential that your chosen gluten-free flour blend includes xanthan gum for proper dough structure. If it does not, you must add 1/2 teaspoon of xanthan gum to the dry ingredients for every 3 cups of flour to achieve the correct dough consistency and prevent crumbliness. We highly recommend Bob’s Red Mill 1-to-1 Baking Flour, which we use every year, as it’s a reliable blend that already contains xanthan gum and consistently delivers excellent results.
- Making the Dough in Advance: For maximum convenience, the sugar cookie dough can be prepared up to 3 days ahead of time. Store it wrapped tightly in plastic wrap or in an airtight container in the refrigerator to keep it fresh. If the dough has been chilled for more than an hour, it will be quite firm. Remove it from the refrigerator at least 15 minutes before you plan to roll it out to allow it to soften slightly, making it much more pliable and easier to roll without cracking or requiring excessive force.
- Dough Thickness is Crucial: Yes, it’s correct – roll your dough to an exact 1/8 inch thickness! This is not a typo and is absolutely vital for developing the signature crisp, delicate texture that distinguishes these gluten-free sugar cookies from softer varieties. Resist the urge to roll them thicker if you want that perfect crunchy bite.
- Precise Baking Times: These thin cookies bake quickly! On a standard baking sheet lined with parchment paper, they typically require about 5 minutes. If you are using a baking stone, which absorbs and distributes heat differently, baking may take closer to 8 minutes. Always monitor the cookies closely, particularly during the final 1-2 minutes of baking. Remove them from the oven the moment their edges turn a light golden brown to avoid over-baking and maintain their crispness.
- Tips for Cutting Out Cookie Dough: Keep a butter knife and a few toothpicks nearby when cutting shapes. Toothpicks are excellent for carefully extracting small, intricate pieces of dough from detailed cookie cutters (like reindeer antlers or small star points) without damaging the shape. If a cut-out cookie sticks to the parchment paper, gently slide the thin blade of a butter knife underneath it to lift and transfer it to the baking sheet cleanly and without distortion.
- Flouring the Work Surface: Gluten-free dough can be more sticky than traditional dough, so be generous with extra gluten-free flour when dusting your work surface and the dough itself. This prevents sticking, simplifies the rolling process, and makes cutting out cookies significantly easier. It’s not uncommon to use nearly an entire 22-ounce bag of GF flour for dusting throughout the entire cookie-making process for one batch.
- Quick tip! If you run out of gluten-free flour while rolling, cornstarch is a fantastic alternative for dusting your work surface. It works just as well to prevent sticking.
Confectioners Icing Notes:
- Adjusting Thick Icing: If your icing becomes too stiff or difficult to spread, add milk slowly. Start with just 1 teaspoon at a time, mixing well after each addition until you achieve a smooth, spreadable consistency.
- Adjusting Runny Icing: If the icing is too thin, gradually add more sifted powdered sugar, about 1/4 cup at a time, mixing thoroughly until it reaches your desired thickness.
- How to Sift Powdered Sugar: For the smoothest icing possible, sifting powdered sugar is crucial to remove lumps. You can use a dedicated flour sifter or a fine mesh strainer.
- Measure Sifted Sugar Accurately: The recipe calls for *sifted* confectioners’ sugar. This means you should sift the sugar into a separate bowl *before* measuring the 4 cups to ensure an accurate volume and the correct icing consistency.